We might be able to find the information for you!
What is it you're looking for?
Any information you might need should be here!
Frequently Asked Questions
Custom Maps are quick to set up now, and should only take you about 5-10 minutes to get everything ready for the first time, then after that we’ve made playing Custom Maps with friends as easy as two button clicks!
To run Custom Maps on Epic Client by yourself, you’ll need:
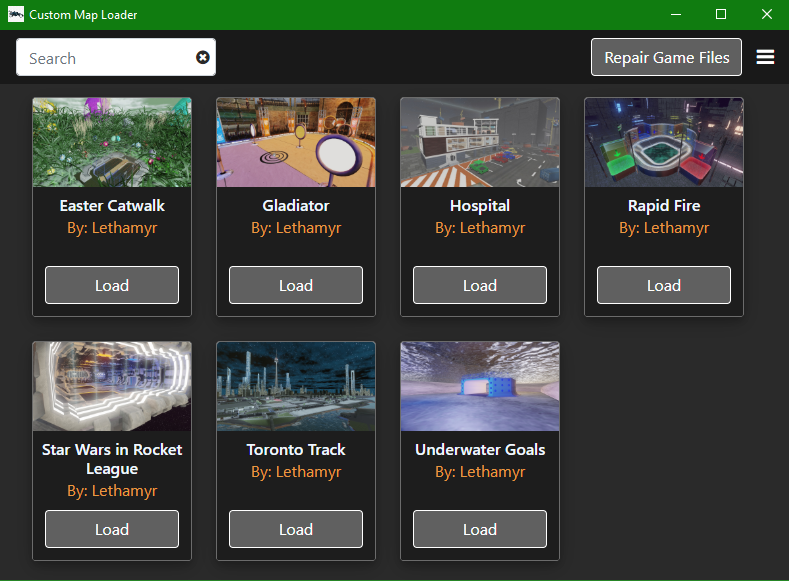
Custom Map Loader
To run Custom Maps with friends on Epic Games Client, you’ll need 2 additional things:
- Bakkesmod + Rocket Plugin
- Hamachi
You can see how to use these programs in the FAQ's below.
Step One
- Click to download the custom map loader here.

Start+download.png 1.71 KB
Step Two
- Double click the download installer
- Click Run

run+the+installer.png 12.55 KB
Step Three
- Run the installer
- If you get this warning, it is because the app has not been given a certificate yet
- Click on info, then run anyway to start the install

Step Four
- Feel free to click and drag the ball around while it installs files
- Not an actual step
Step Five
- Create a folder next to the exe and name it 'Map Files'.
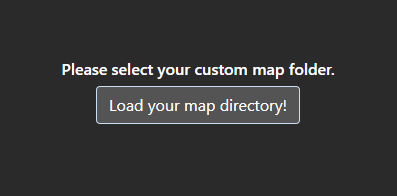
Step Six
- On first load-up, the Custom Map Loader will ask you to load your map directory
- Click on the “Map Files” folder you created in Step 3 and click “select folder”
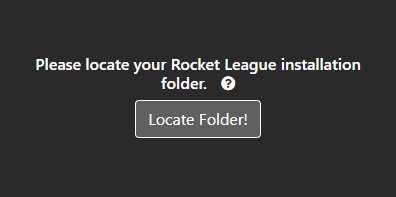
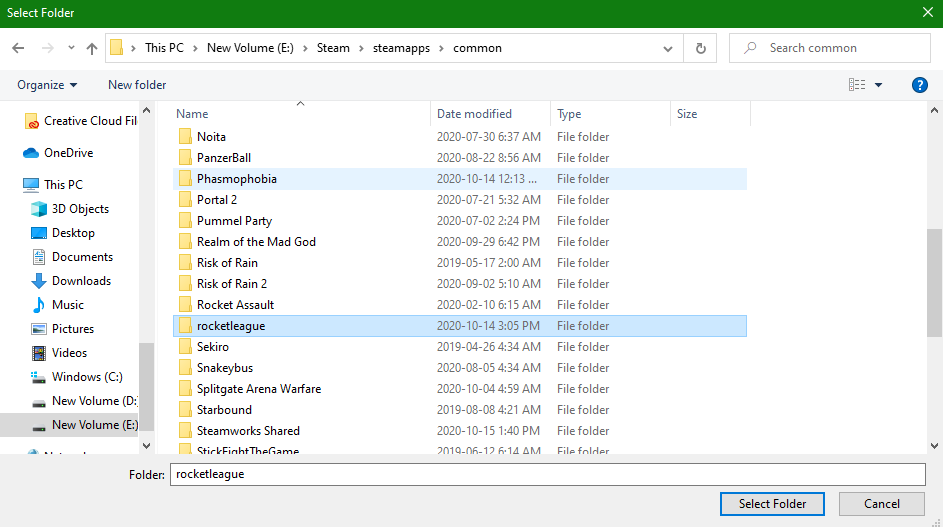
Step Seven
- Read the ? to help you find the “rocketleague” folder on your computer.
- Click on Locate Folder
- NOTE: This is the actual rocket league install folder. EPIC Launcher creates a separate “Rocket League” folder on your computer that is unrelated. The name of this folder will be “rocketleague”
Step Eight
- As the ? will say, this is commonly where your steam files are found (default is usually C:\Program Files\Epic Games\rocketleague or C:\Program Files\Steam\steamapps\common\rocketleague)
- Find your “rocketleague” folder and click “select folder”
Step Nine
- The app is now installed and ready to be used!
- The easiest way to import maps is to download them off this site and then click on the “import” button.

Step Ten
- To import a map, it is as easy as downloading a .zip folder from this website and then importing it with the app.
- Just click import and navigate to the map you download and select it.
- The Custom Map Loader will see new maps every time it’s loaded for now.
- I’d suggest pinning the Custom Map Loader to the taskbar. If you don’t want to, just search up CustomMapLoader in the Start Menu.
- To play your custom map you loaded, just open up Underpass in Freeplay or LAN Match. Enjoy!
- This app can be uninstalled through regular “Uninstall or Remove Programs” but if that doesn’t work:
- Go into your files on the computer
- In the address bar, type in %appdata%
- Delete the “Custom Map Loader” folder in AppData\Roaming
- Delete the “CustomMapLoader” folder in AppData\Local
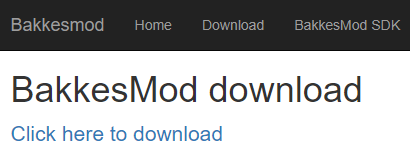
Step One
- Download Bakkesmod here
- Click on the blue hyperlink to download
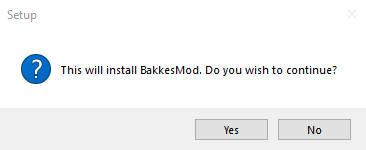
Step Two
- Extract and place the exe where you’d like and run the installer
- Click on Yes to install Bakkesmod
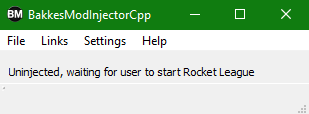
Step Three
- Bakkesmod should now be installed and you should have a window that looks like this
- Keep this open for Step 4
Step Four
- Download Rocket Plugin here
- Have Bakkesmod running (like Step 3) and click on the blue “Install with Bakkesmod” button
- This should download and install the Rocket Plugin into the Bakkesmod folders
- If this doesn’t install automatically, follow Step 5
- If this works, you’re done! Bakkesmod is ready to go
- Press F2 in game to open Bakkesmod
Step Five (if step 4 fails)
- Manually Download Rocket Plugin
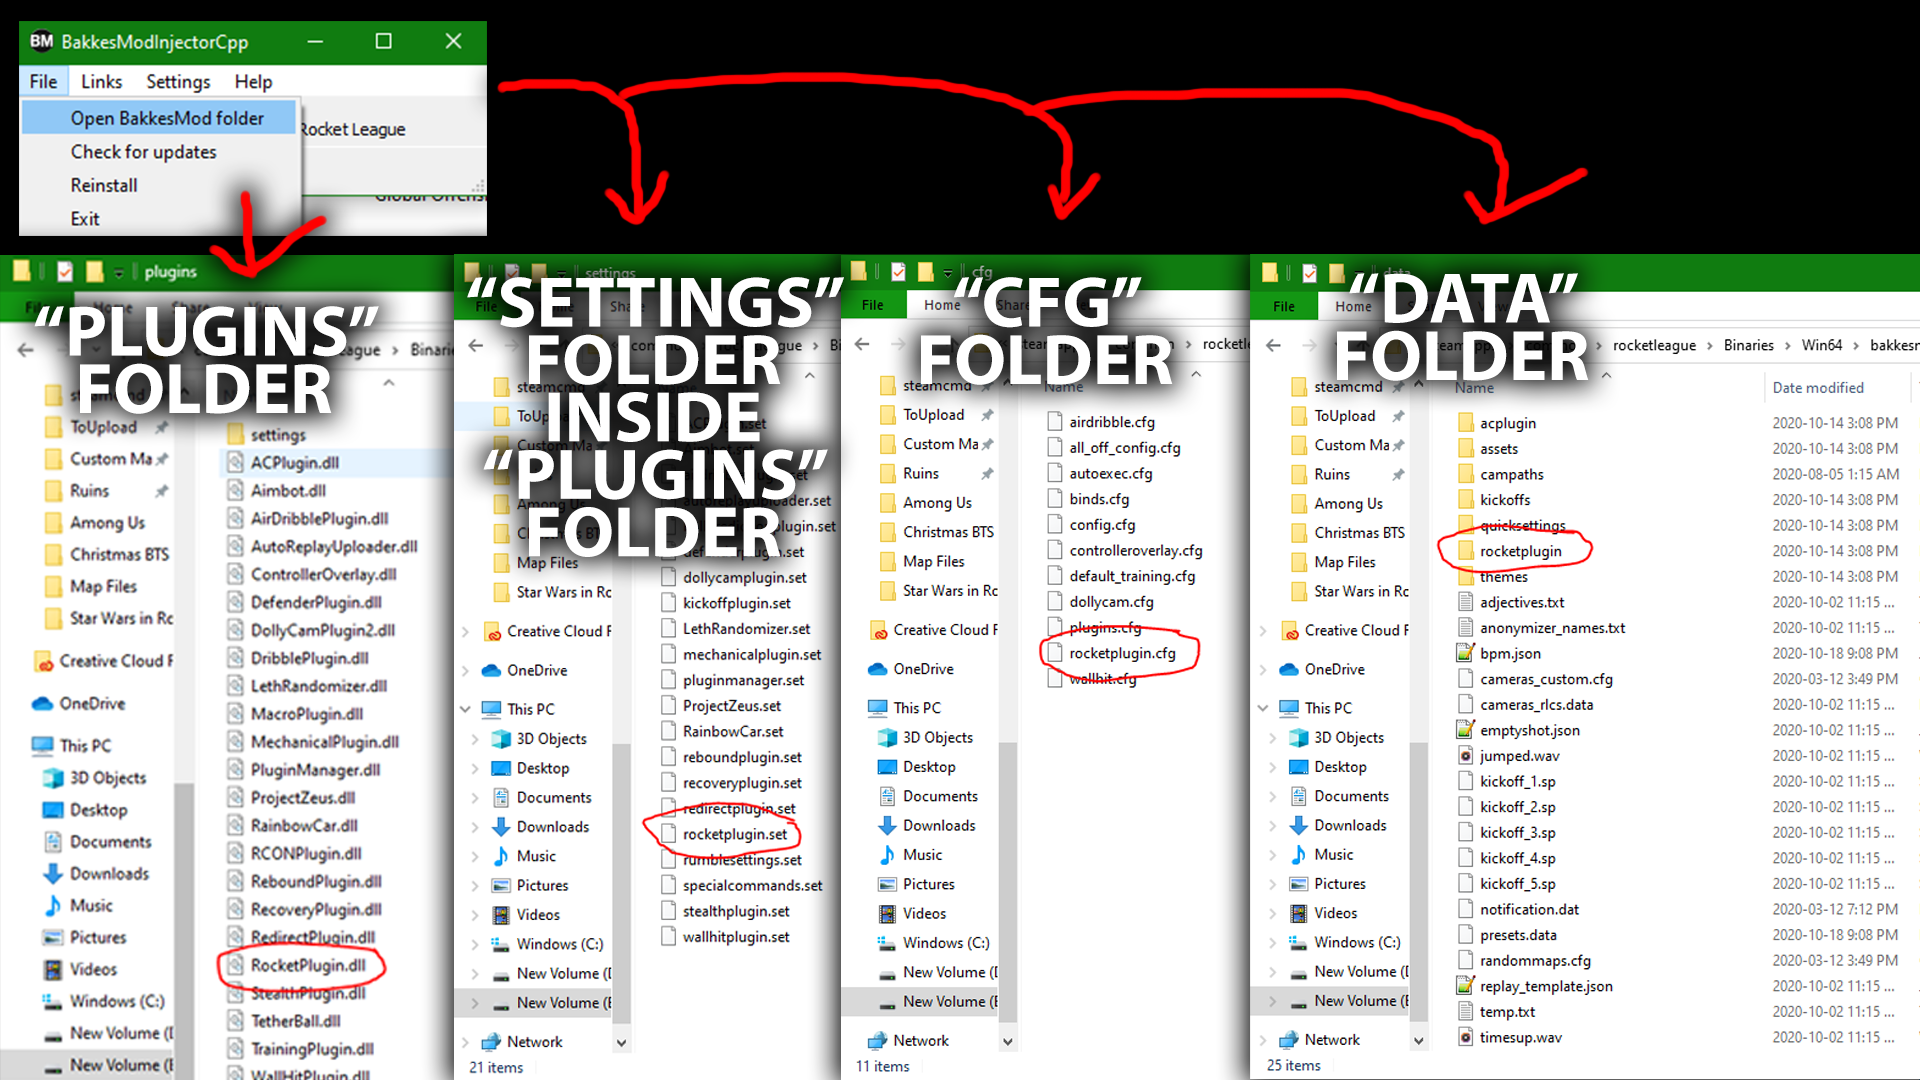
- Go to Bakkesmod and go to file->Open Bakkesmod folder
- Open the Rocket Plugin Zip Folder
- Place each file in its proper folder locations in the Bakkesmod files
- Check the photo for where the files should be located at the end
- Go into Bakkesmod, click on File->Open Bakkesmod folder
- In the address bar, click on Win64
- Delete the “bakkesmod” folder
Step 1
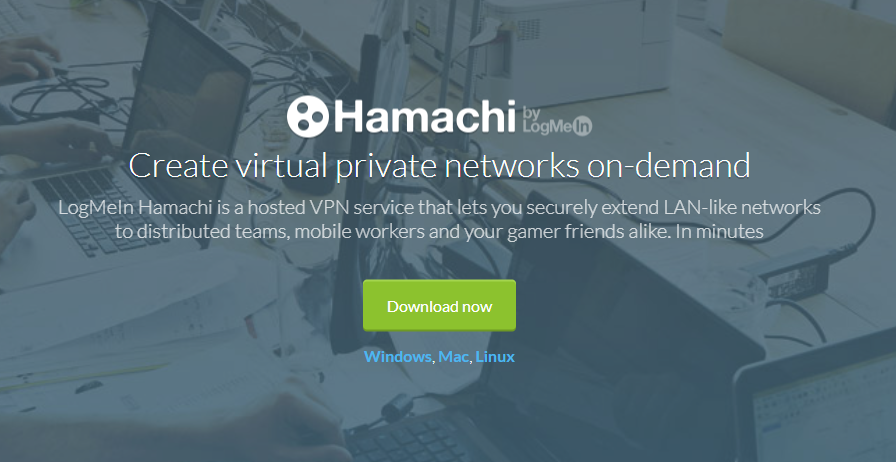
- Download Hamachi here
- Click the green “Download now” button
- Run the installer and make sure to disabled any additional programs from installing if prompted
Step 2
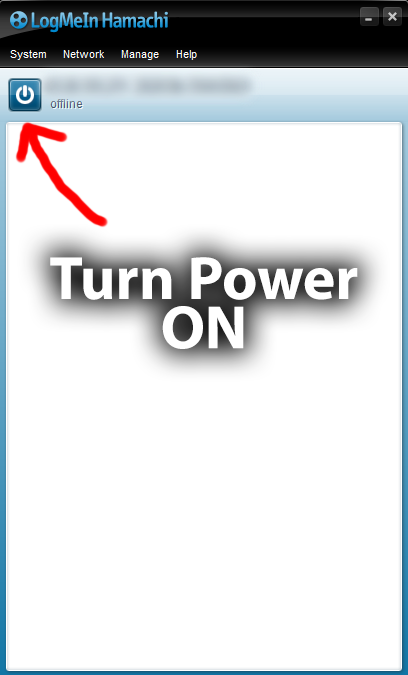
- Once Hamachi is installed, set up an account with email and password
- You should have a window like the one below
- Turn the Power button on to have your VPN active
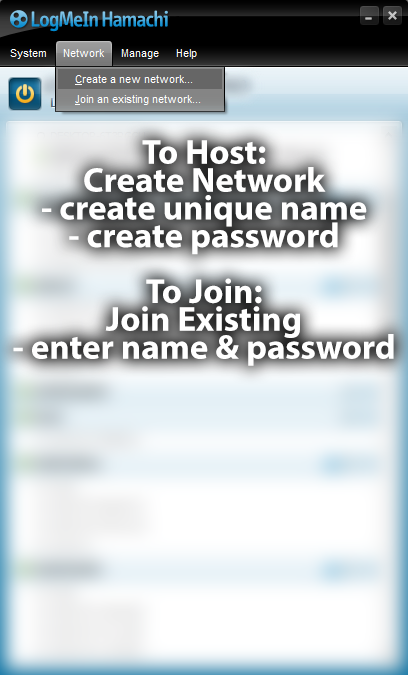
Step 3
- Once the power button is on, click on Network
To Host:
- Create a new Network
- Enter a unique name and password
- Give the name and password to your friends
- Have your friends right-click your computer in the network and copy ipv4 address
- For 6 or more players, create a second network for the remaining players to connect to you. You only need each player to see you in at least 1 network to be able to connect
- Ensure your connection to all players is green (not blue or grey)
- Blue means routing issue/relay tunnel (could be solved by changing firewall settings or restarting router), grey means host’s hamachi is offline
To Connect:
- Join an existing network
- Enter name & password given by the host
- Once in the network, right click the host’s name in the network and copy ipv4 address
- Ensure your connection to the host is green (not blue or grey)
- Blue means routing issue/relay tunnel (could be solved by changing firewall settings or restarting router), grey means host’s hamachi is offline
Step 4
- Choose what map you would like to play with your friends, and ensure EVERYONE clicks “Load” in the Custom Map Loader before trying to host or join
- Keep the Custom Map Loader open while the game is running
Step 5 (In Game)
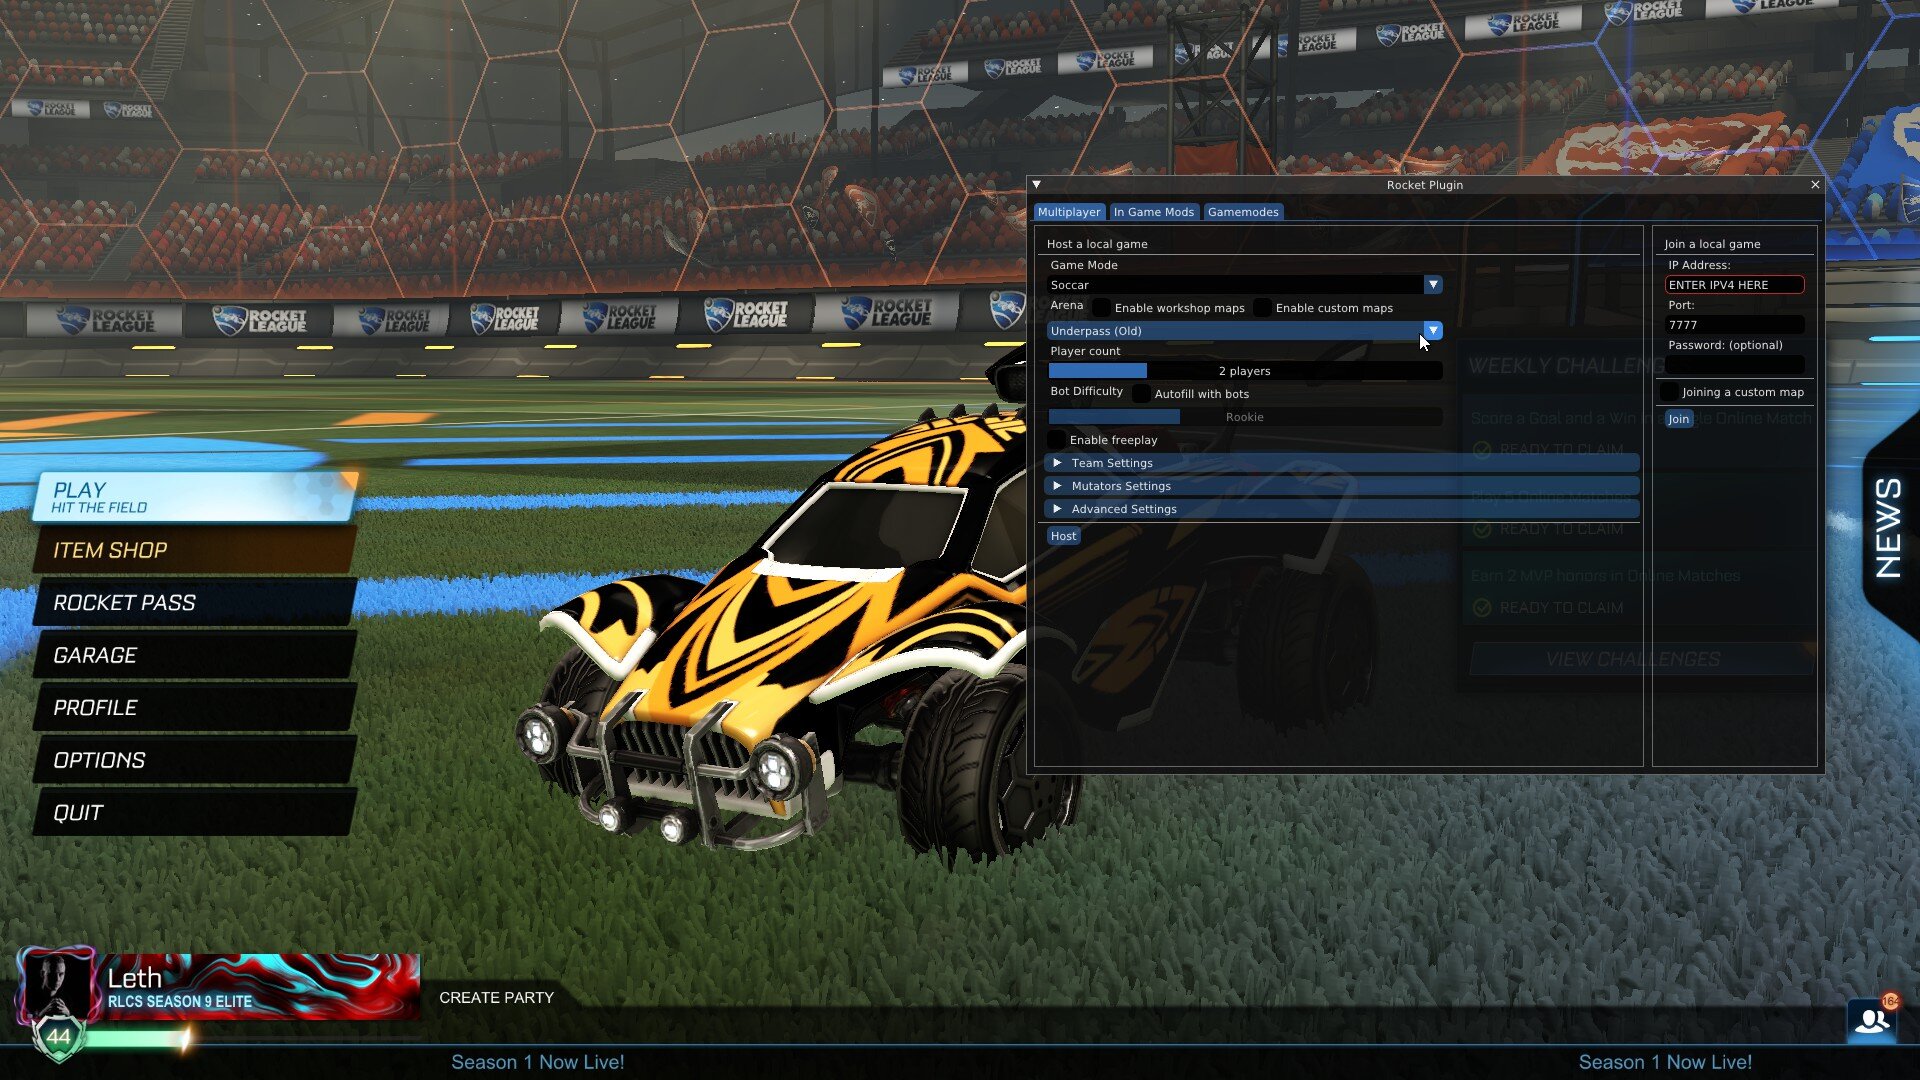
- Have Bakkesmod running (see how to set up Bakkesmod above)
- Open Rocket Plugin using the Home button
- If a window doesn’t open, press F2 to open Bakkesmod, and navigate to the plugins tab
- Click on Rocket Plugin in the dropdown menu (if you don’t see it here, it may not have installed properly, see Step 5 of installing Bakkesmod)
- Click on Open Rocket Plugin GUI

Step 6
- To Host a match, either start a LAN match in the Custom Games tabs in-game, or use the left-hand side of Rocket Plugin to set your settings and map. Rocket Plugin allows you to run any game mode on the “Underpass” map like Dropshot for certain Dropshot custom maps
- To join, all you need to do is use the copied ipv4 and paste it in the “local ip address” and click join once the host is in the map
- Do not mess with any other “join a local game” settings. Just put the ipv4 in and join, that’s it

Step 7 (Host only)
- If you’re using Rocket Plugin to create the LAN match, pick “Underpass” from the map dropdown menu
- Feel free to change the mutator and game mode settings as you prefer
- Click host in the bottom left
- Let your friends know when you’re in the map and they can join
Yes, everyone that wants to play will have to do the same set up. In particular, they will need to have the same map loaded in the Custom Map Loader, and to have Bakkesmod and Rocket Plugin installed. They will also need Hamachi (or your chosen alternative).
Yes, there is an API for the maps. You can find the API here:
https://lethamyr.com/api/v1/maps?page=1
Creators can use this to easily load my maps into their mod loaders.
Unfortunately not. It is not possible to use mods on console, so custom maps will only be made available if they are officially supported by Rocket League.
No, you don't. You can even load a new custom map while still playing on the previous one!
Yes, BakkesMod is now available for Epic! You can find instructions on how to play with friends in the first few FAQs.
This means that there is an issue with your Map Files folder. The first thing to do is to double check that you have selected the correct folder, which you can do by opening the menu in the top right of the Custom Map Loader, and choosing “Open Custom Map Folder”. If you have selected the incorrect folder, you can change this by choosing “Change Custom Map Folder”.
If the correct folder has been selected and you are still getting this error, then there is a problem with the location of the map file, which will have the file extension .udk. This should always be located in Map Files -> Folder named after map -> .udk file. For example, you would expect to find the Ice Rings file in Map Files -> Ice Rings -> LethIceRings.udk.
One common issue is that you may have ended up with nested folders, meaning that where you would expect to find the .udk there is another folder instead. In this case you might see something like Map Files -> Ice Rings -> Ice Rings -> LethIceRings.udk. This can be easily fixed by moving the .udk and other files up one level into the correct folder.
Another possible issue is that the folder that should contain the .udk is empty. If this happens after using the import function in the Custom Map Loader, then it can usually be fixed by using the import function again. If you are importing maps manually, then simply make sure that you have copied all the files over.
RocketLeagueMapMaking.com has plenty of guides and resources to help you get started with map making in Rocket League. There is also a linked Rocket League Mapmaking Discord Server, where you can get in contact with other map makers. If you would prefer video guides, Simple Shark is creating a series of tutorials which are available on his YouTube.
Many Discord servers have channels where you can look for people to play with. One great place to look is the Community Workshop Games Discord Server, which is dedicated to getting groups of people together to play custom maps.
There is an extensive troubleshooting page for BakkesMod, so look there first. If you've read through that and are still having issues, then you can try the BakkesMod subreddit. IMPORTANT: Make sure you read through the pinned posts before asking your question. If your question isn't in the correct format, it will not be answered!
There is a Rocket Plugin Discord server (https://discord.gg/hWPX9tq) where you can ask questions.
The first thing to check is that both you and the host have loaded the same map in the Custom Map Loader. If that isn't the issue, then it is likely that you are missing a texture file. All necessary texture files should have been installed automatically when the Custom Map Loader was installed, but if this has failed, then you can manually download the textures HERE. Once you've downloaded the folder, unzip it (right click, extract all), and copy all the files into rocketleague\TAGame\CookedPCConsole.
The host should create a new private match with no password, then try hosting again. This should clear the password.
Firstly, make sure that you have copied the correct IP address from Hamachi. If you have entered the correct information and are still unable to join, then it may be that your firewall, or the host's firewall, is blocking the connection. You can test for potential connection issues in Hamachi by using the inbuilt diagnostic tool, which can be accessed via the help tab. If that fails to find an issue, another test is to see if you can ping each other within Hamachi.
If there is a problem with your firewall blocking your Hamachi connection, then following the instructions HERE will usually resolve this.
When you use the Custom Map Loader, the custom map you've selected will be swapped with Underpass. Simply choose Underpass from the list, and the custom map will load.
You can go to my Discord Server and ask for help in the #modding-and-mapping channel.
If you had a custom map loaded, and did not repair the games files before queuing for rumble, then your version of Underpass will conflict with the version on the Rocket League servers. Make sure you return Underpass to its original state before queuing for rumble by clicking “Repair Game Files” in the Custom Map Loader.
It isn't possible to play custom maps in private matches. If you want to play custom maps alone, you can use freeplay or a LAN match. If you want to play custom maps with friends (or want more control over mutators), you can host the match using Rocket Plugin.
To change the ball you need to host a match through Rocket Plugin, and choose the correct game mode for the map.
Firstly, check that you are trying to play on Underpass rather than Tokyo Underpass. If you've selected Underpass and it is still loading normally, then this means that your version of Rocket League has been installed in a non-standard way. You may find that if you launch Rocket League via the .exe located in \rocketleague\Binaries\Win64, and select Underpass in freeplay, then the custom map will load.
This issue can often be fixed by uninstalling and reinstalling Rocket League via Steam/Epic. If that doesn't work, a potential workaround would be to pin the .exe and use that to launch Rocket League instead.
If you have any issues with the suggested location of your Map Files folder, don't worry, you can actually create it anywhere. Just make sure that it's somewhere you will remember, and can navigate back to!
This error usually occurs when the wrong Rocket League folder has been selected. You can change this by opening the menu in the top right of the Custom Map Loader, and choosing “Change Rocket League Folder”.
The correct folder will usually be found in Program Files, not Documents. The default for most people is C:\Program Files\Epic Games\rocketleague for those using Epic, or C:\Program Files\Steam\steamapps\common\rocketleague for those using Steam. If it isn't in Program Files then try Program Files (x86).
Occasionally this error will occur even if you have selected the correct folder. In this case uninstalling and reinstalling Rocket League will often fix the issue.
When you use the Custom Map Loader the custom map you've selected will be swapped with Underpass. If you want to play custom maps alone, you can select Underpass in freeplay or a LAN match. If you want to play custom maps with friends (or want more control over mutators), you can host the match using Rocket Plugin, where you can select Underpass.
This often happens when the import function is used on a zip folder that was not downloaded from this website. These maps have to be imported manually, instructions on how to do this are given in the answer to the previous question.
Yes! Hopefully in the future it will be possible to download them from the Community Maps section of this website, but for now you can use the Steam Workshop Downloader. The following steps will allow you to import any map from the Rocket League Workshop into the Custom Map Loader.
- Find the map you want to download on the Rocket League Workshop E.G. (https://steamcommunity.com/app/252950/workshop/)
- Copy the web address into the Steam Workshop Downloader
- Download the zip folder
- Unzip the folder (right click, extract all)
- Copy the folder into your Map Files folder
The map should then show up in the Custom Map Loader. If you want to change how the name of the map appears in the Custom Map Loader, simply change the name of the folder containing that map.
To add maps to the Custom Map Loader you will need to download and import them. You can find instructions at the top of this page!